Everything I Made For My Wedding
- Katie Rowe
- Oct 31, 2025
- 10 min read
This blog has been quiet for a long time — and it will probably continue to be quiet. But as someone destined to be a DIY bride if a bride at all, I figured I should make a brief return to document some of the things I* made for my wedding.
*With lots of help from my husband, family, and friends! I also want to avoid perpetuating the common misconception that I was in charge of the wedding… my husband was very involved, and made almost all of the phone calls. I will admit that most of the crafts were my idea & executed mostly by me.
Presented in chronological order (from the perspective of a wedding guest):
Invitation Stamps
Starting small! We hand-carved some stamps of shapes related to the wedding and our lives in general, which we used to add some character to a bunch of random things throughout the wedding process - Beginning with our invitation envelopes.


We made the original stamps together at a craft cafe in Kansas City, which brought back a lot of summer art camp memories for me. I enjoyed it so much that I ended up buying a basic linoleum carving kit when I got back home, and adding a few more.
Most of our invitations went out with a stamp of our cat, Sylvia. In cases where we knew the guests’ cats, we included their cats too — and in some special cases, we swapped in a different stamp.
Welcome Reception Banner
This one was a collaborative project, done during my “bachelorette party” (a picnic in Prospect Park, followed by a trip to the theatre). We hung this for our welcome reception the night before the wedding, which was held outdoors at a brewery.


This project was both a great stash-buster and a nice way to involve friends and loved ones in the process - especially those who lived further away and weren’t as involved in our day-to-day projects.
Before my trip to NY, I cut a bunch of triangles out of random scrap fabric I had lying around and bought some fabric markers and ink. Since we would be doing this activity at a picnic, I also prepped some “clipboards” (which were just pieces of cardboard and clothes pins).
During the picnic, my friends helped decorate the flags as they wished, using some of our stamps, the markers, or a combination of both.
When I got back home, I ironed all the flags to set the ink, sewed each printed flag to a blank one and turned them, and then sewed them together into a long banner using a roll of pre-made bias tape. Shoutout to our neighbors who had recently rebuilt the top of our outdoor table - The final assembly would have been much harder without a long, steady work surface.


I’m really happy with how this turned out - I love it so much it now hangs in my office! It brings me joy to look over the flags (especially the custom drawn/written ones) and think of the people who made each one. Bradly and I wanted our wedding to be a celebration not only of our own relationship, but of all of our most meaningful relationships, and this banner was one way we were able to memorialize just a few of those relationships.
Welcome Reception Dress
I threw this together the weekend before the wedding out of sheets from Savers (including the lace trim from two separate sets), some elastic thread, and a dream.


I did not follow a pattern or really even measure anything for this dress, although it was loosely inspired by a shirred dress tutorial I watched years ago by Rosery Apparel. It was thrown together in such a slapstick manner that I dramatically misjudged the pocket placement and didn’t bother to fix it — They are at about knee-height, and will stay there. But it was very comfy, easy, and pretty much free (the only thing that didn’t come from my thrift stash was the shirring thread, which I had to buy in white so it wouldn’t show through).
I have since avocado- and coffee-dyed this dress in an attempt to make it appropriate for another event, and that was also a little shoddy so I might chemical dye over it. Would definitely wear again though!
Wedding Dress
The main event! Although not, by a long shot, the most difficult project on this list.


I knew early in the wedding planning process that I wanted to make A wedding dress, and decide afterward if I liked it enough for it to be THE dress. I ended up procrastinating this so much that it probably would have been difficult to buy one and have it altered, so I’m lucky I ended up liking it!
For this dress, I used a slightly altered version of this pattern, which I got on Etsy. I am too impatient to do a real toile, but I did make a shorter version of this dress out of sheets over the summer before starting the main one. Based on that process, I eyeballed a few adjustments to the bust for the final pattern, which ended up working out pretty well.
I found a set of woven tablecloths (I think?) at Savers, which had a lovely embossed poinsettia pattern, and decided that fabric was worth of the gown. Since the pattern I’d chosen wasn’t super formal, I thought using a fabric with some heft (which these tablecloths definitely had) might add a little more gravitas. I did not realize until I started cutting the pattern out of them just how much staining there was, so I ended up bleaching them several times… Even so, I had to avoid large swaths and recut a few pieces where I didn’t notice until too late (and if I’m being honest, the final dress DID have some little ones in inconspicuous places. I did my best).


Other than that it was a pretty straightforward process! My friend Catherine let me borrow her invisible zipper foot so I finally learned how to put in an invisible zipper the right way. I ended up using a blue zipper as a nod to “something blue” (and because I happened to have one of the right length). Catherine also heroically pinned the hem for me, which was extremely helpful.
Wedding Veil
Industry secret (maybe): Veils are so easy! And they’re so expensive! If you need one you should just make one. The only thing I bought for this was the veil comb (which was probably about $3).


For the main material, I used a large scrap from a gauzy curtain material I had from a project a couple years ago. Note: it was a woven fabric and NOT tulle or lace, which seems to be pretty unusual based on the small amount of research I did, but it worked just fine. It did make it more important to do a zigzag stitch around the outside to reduce the fraying.
My Mom very generously gave me her veil, which a friend had made for her when she and my Dad got married. I wasn’t able to reuse the tulle, but I did snip off a bit of the beadwork and lace to use as a decorative element on the veil comb.


I used one of my favorite techniques for this project: I watched 2 different YouTube tutorials while I was on the train, and then created my own strategy that didn’t quite follow either the next day. I didn’t measure anything and I didn’t have enough fabric to try different lengths, but luckily I was happy with the first try.
Aisle Runner
In the early stages of wedding planning I had bought a giant industrial-sized roll of lace for $20 at the creative reuse center. It became a solution searching for a problem for about 8 months, daunting me from the fabric bin next to my ironing table. Then, a couple weeks before the wedding, Bradly had a stroke of genius: The lace was the exact width of the burlap roll we had bought to lay down in the aisle.


Executing this one was simple, but time consuming. I hand-tacked the lace to the burlap every few feet, which required a lot of smoothing and re-adjusting to avoid bunching. By the end, I was wearing rubber thimbles on multiple fingers to reduce burlap-burn.
We also weren’t sure the exact length of runner that would be needed, so I packaged this for the day-of with scissors, a threaded needle, and instructions for what to do if it needed to be shortened on-site (by the day-of-coordinator or our wonderful setup volunteers).
Table Runners
These were the bane of my existence. I don’t know why I did this, except that I got a few rolls of taffeta steeply discounted at the Joann close-out sale.


To make the runners, I cut the taffeta into long strips with triangle sections at the end, sewed two together with a gap to turn, and then used a decorative stitch on my sewing machine to add the border.


Pros of this project: I hadn’t really explored the decorative stitches on my machine at all prior to this, and it’s definitely a fun option that I will explore using more in the future. Also, we offered (/begged) for guests to take these home if they had any use for them, and a few people did take us up on that — It’s been fun to see them pop up in other people’s homes and dinner parties, as well as our own.
Cons of this project: First of all, time. Although the shapes are simple, they take way longer than you’d expect because there is just a lot of distance to cover. The decorative border alone took nearly an hour for each runner, because the machine runs pretty slowly when doing the leafy stitch. To avoid dragging this project out for weeks and months I found myself getting up at 5 am to try to get through a couple before work, and banishing myself back to the factory after dinner — No variation, no creativity, just pure production. I’d estimate it took 45-50 hours total for all 18, not including initial design and prototypes.
Also, I never figured out how to stop these from being bubbly and bunchy! I’m sure part of it is that all the wedding sewing (ESPECIALLY this project) threw my sewing machine tension out-of-whack, and I just powered through it rather than lose the machine for a few weeks to service. I was also in such a dedicated mass production mode that I was unwilling to be derailed by (legitimate) QA/QC concerns.
In conclusion, of all the projects on this list, this one would definitely get voted off the island first. Despite that, I did learn a lot.
Signs
This was another last minute addition! Our reception was under a picnic shelter and using picnic tables, so we originally envisioned a casual open-seating vibe. However, we didn’t have a ton of spare capacity relative to the guest count, and we ultimately decided that table assignments would be helpful.


To facilitate that, we threw together some simple signs for each table with a list of guests on one site and photos on the other. For tables 1-10, we used pictures of us at the appropriate age - coordinated by theme where possible! For the other tables, which mostly had our families, we used a family photo. We had already collected a bunch of photos from our generous friends and family for use in a slideshow at the Welcome Reception.
In addition to the table signs, I also designed signs for the food and drink tables, guest favors, card basket, etc. Each sign had a little leaf motif that I had sketched to match some of the other décor (including the table runners).
Most of our signs were displayed in acrylic sign holders that we bought online, which worked pretty well. We did learn that it’s way easier to put the signs in the holders if the two sides are on the same folded paper, rather than two separate slips.
Guest Favors
We had two homemade components of the guest favors:
First, we made a little cloth bookmark for each one out of some of the scrap fabric for the wedding. These had fabric from the wedding dress on one side, and the runners on the other, with a ribbon tab on one end. I also added a bit of the decorative leaf stitching to match the runners.


The bookmarks were another mass production effort - Although they were individually much quicker than the runners, there were many more of them. I also never got the two fabrics to work well together. But for 120+ in a week or so, they didn’t turn out too bad.
We also included a little self-illustrated zine documenting our attempts to go on a day trip to every town in our state, with our tips for how to do something similar.


We packaged these in pillow boxes with a little wildflower seed paper heart, and added a tag describing the favors to the outside. Shoutout to our friends Matt and Kelley for helping us tie all the little bows.
Note to anyone buying pillow boxes in bulk: The dimensions reported are the OUTER dimensions, so you have to account for the curves when deciding if your things will fit. We messed this up the first time.
Our other big favor mistake was, apparently, just making way too many. We ended up with dozens leftover at the end.
Cake Topper
We finalized the details of our cake situation pretty late in the process, and so it was only a couple weeks before the wedding that someone asked us what kind of a cake topper we were going to have. This had not occurred to us, and we didn’t have one.
After some quick Pinteresting we landed on 2 DIY options: Polaroid pictures, or little birds (Bradly loves birds). We decided to go with a cute pair of bridal birds.


Due to how late we decided to do this (and how many other projects we were juggling at the time) we ordered the birds online. I have since learned that Michaels sells similar (honestly maybe the same) birds in their wooden section, so maybe we could have painted our own.
I made their headwear - The top hat was hot glued together from the cardboard backing of a notebook, and I made the veil from a snip of my giant lace roll and more beading from my mom’s veil. I also made the tiny bunting banner out of scraps from my wedding dress and the runners, some twine, and two wooden skewers. The little hearts were leftover seed paper hearts from our gift favors, which I glued to a the pieces of wood that I had trimmed off the other skewers.


We didn’t make our cake, but we LOVED it! We got a series of donut cakes from Allie’s donuts, including the 2-tier sweetheart cake that held the topper and a really delightful portrait of our cat.
Honorable Mention: Flowers
This is craft-adjacent, but we did also do the flower arrangements ourselves. We bulk ordered some staples (baby’s breath, eucalyptus, etc) ahead of time, and then got our “main character” flowers from a local bulk flower store the weekend of the wedding.

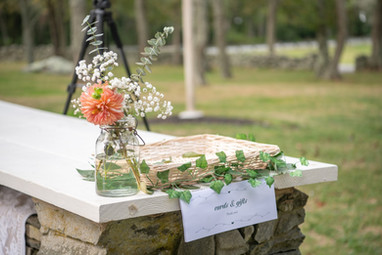


With lots of help from family, we spent an afternoon arranging these in jars (generously gifted to us by friends from their own wedding). We’d picked a variety at the bulk store, so we did a few different types of arrangements - The flowers for the ceremony space featured orange dahlias, while those for the reception were a combination of all-white roses and while roses with purple accents.


Luckily, we were able to donate all of the flowers that were not taken home by guests at the end of the reception.
I think that’s the end of the project list! If you made it this far, you are probably my Mom or my husband. Thanks for reading.


Comments